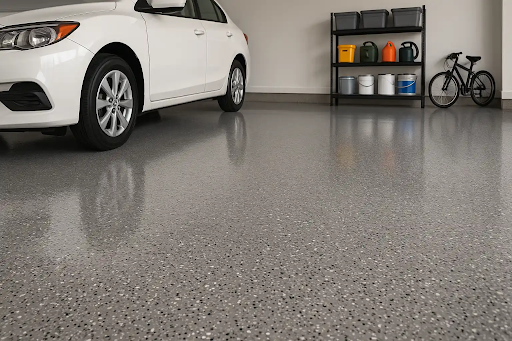
So you’ve finally decided to do something about that cracked, stained garage floor. Good call. A lot of homeowners in Woodland Park, NJ put this off for years until they walk into a neighbor’s garage and see how good it can actually look.
That polished, spotless finish? Chances are it came from garage floor epoxy. It’s one of the most popular upgrades homeowners are making right now, and it’s not hard to see why. The results speak for themselves.
Epoxy coatings bond directly to the concrete surface. They create a hard, seamless finish that resists oil, water, and everyday scuffs. Cleaning your garage floor becomes something you can knock out in under five minutes. That alone makes it worth it for most people.
Before you get started though, it helps to know what you’re walking into. This isn’t like slapping on a coat of paint. There’s real prep work involved, and cutting corners will cost you later. Done right, a quality garage floor epoxy system can last 15 to 20 years. That’s not a quick fix that’s a long-term home investment.
This guide walks you through everything: prep, cost, timelines, choosing a contractor, and what to watch out for. No filler, just the stuff that actually matters.
Start by Checking What You’re Working With
Here’s something most people don’t think about until it’s too late: the epoxy is only as good as what’s underneath it. If your concrete has moisture issues, old sealers, or serious cracks, the coating won’t bond properly and you’ll end up peeling it up within a couple of years.
A simple moisture test goes a long way. Tape a sheet of plastic down to your floor, seal the edges, and come back in 24 hours. If there’s condensation underneath, you have a moisture issue that needs to be addressed before you do anything else.
Older homes around Woodland Park, NJ sometimes have garages with concrete that’s absorbed years of oil, salt, and road grime. That stuff doesn’t just wipe away. It needs to be properly cleaned and sometimes chemically treated before the epoxy will adhere.
According to epoxy coating research, epoxy resins form strong covalent bonds with properly prepared concrete surfaces which is why surface prep directly determines how long the coating holds up.
Small hairline cracks can be filled with a concrete repair product before coating. Larger cracks with movement suggest a structural issue. A contractor can walk through this with you during an estimate, and most do it for free.
The Prep Work Makes or Breaks the Whole Job
Any experienced contractor will tell you this straight: prep is 80 percent of the job. You can buy the most expensive epoxy available and still end up with a peeling, bubbling mess if the surface wasn’t prepared properly.
Diamond grinding is the gold standard for surface prep. It mechanically opens the pores of the concrete so the epoxy can penetrate and bond. Acid etching is an alternative, but it’s messier, less consistent, and not always effective on older or heavily soiled slabs.
After grinding, the floor gets vacuumed, cracks get filled, and then the surface needs to dry completely. Depending on weather conditions, this can take 24 hours or longer. Rushing this step is the single biggest reason DIY epoxy jobs fail.
If you’re hiring a pro, watch how much time they spend on prep. If someone shows up and jumps straight to mixing epoxy without grinding the floor first, that’s a red flag.
A Realistic Look at What This Will Cost You
Let’s get into numbers. Understanding garage epoxy floor cost before you start shopping around helps you spot fair quotes from inflated ones.
For a standard two-car garage usually 400 to 500 square feet professional installation typically runs between $1,500 and $4,000. That spread depends on the condition of your concrete, the type of epoxy system being used, and whether you’re adding decorative elements like flake or metallic finishes.
DIY kits from home improvement stores start around $100 and go up to $400 or so. But here’s the honest breakdown: if you don’t own a floor grinder, you’re already adding a rental cost. If the floor has serious prep needs, you’re adding more. And if the job goes sideways, you’re paying a contractor to redo it anyway.
The garage epoxy floor cost also shifts based on the finish you choose. A basic solid-color coat is the most affordable. Full metallic or 3D epoxy finishes are on the higher end. Most homeowners in the area land on a chip or flake system it hides minor surface imperfections, looks sharp, and holds up well to daily traffic.
Polyaspartic topcoats are an upgrade some contractors offer. They cost more upfront but cure faster, resist UV yellowing, and handle hot tire pickup better than standard epoxy alone. Worth asking about.
Picking the Right System for Your Garage
Not all epoxy is created equal. There are water-based options, solvent-based options, and 100% solids systems. Each one comes with different tradeoffs in terms of durability, ease of application, odor during curing, and cost.
Water-based epoxy is easier to apply and has a lower odor. It works fine for garages that see light use. But in a garage that gets daily vehicle traffic, heavy tools, or temperature extremes, it may not hold up as well long-term.
100% solids epoxy is the professional standard for high-traffic applications. It contains almost no solvents, so it doesn’t shrink as it cures. The result is a thicker, harder coating that resists chipping and impact much better.
If you’re not sure which system fits your garage, describe how you use the space to any contractor you get an estimate from. Workshop or hobby garage? Different needs than a simple parking space. A good pro will match the product to the application.
Finding Someone You Can Trust to Do It Right
The contractor you choose makes all the difference. Ask to see photos from previous jobs. Ask specifically what prep method they use and how long they spend on it. Ask if they offer a warranty and what it covers. A quality contractor answers all of this without hesitation.
For homeowners who want a smooth process from start to finish, working with a trusted garage floor coating service means you get professional prep, quality materials, and someone who stands behind the work. That peace of mind is worth a lot.
If you want a specific finish and a clean result the first time, connecting with an epoxy floor installation expert helps you avoid the common pitfalls that turn a straightforward project into an expensive redo.
Get at least two or three quotes. Prices vary, but so does quality. The lowest bid isn’t always the best deal, especially when prep work gets cut to save time.
Maintenance Is the Easy Part
Once your floor is installed and cured, keeping it looking great requires almost no effort. Sweep regularly to prevent grit from scratching the surface. Mop with a mild cleaner when needed. Avoid harsh acidic chemicals they can dull the finish over time.
If you notice areas where the topcoat starts to look worn after several years, a fresh topcoat can be applied without redoing the entire floor. This is a much cheaper refresh option than a full reinstallation.
Adding an anti-slip additive to the topcoat is worth considering, especially if the garage gets wet from rain or snow. It’s a simple addition that makes a real difference in safety, particularly for families with kids or older adults.
According to concrete flooring, properly sealed concrete surfaces offer significantly improved durability and hygiene which supports why an epoxy system is one of the smartest investments you can make in your garage.
What to Expect on Installation Day
Professional installation typically takes one to two days. Day one covers surface prep and the base coat or primer. Day two handles the main epoxy coat and any topcoat or decorative elements. You’ll need to stay off the floor for about 24 hours after the final coat, and avoid parking on it for the first 72 hours.
Weather matters more than people expect. Epoxy doesn’t cure properly in cold or high-humidity conditions. Most contractors won’t install it below 50 degrees Fahrenheit or when rain is in the forecast. In the Woodland Park, NJ area, spring and early fall tend to be the ideal windows.
Clear your garage completely before the crew arrives. Everything needs to come out vehicles, bikes, shelving units, storage boxes, all of it. Some contractors help with this. Most don’t. Confirm beforehand so you’re not surprised.
Frequently Asked Questions
How long does an epoxy coating actually last?
A professionally installed system with proper prep typically lasts 10 to 20 years. DIY kits, when applied correctly, often last 3 to 7 years depending on the product and traffic level.
Can epoxy go over an existing coating?
Usually not. Old coatings need to come off first. Applying epoxy over a failing surface just delays the same problem. Strip it down to bare concrete for the best result.
Is the garage safe to be around during installation?
There are fumes during the application process. Keep the area well-ventilated and stay out of the garage for at least 24 hours after the final coat. Once fully cured, the surface is completely safe.
Does the weather in New Jersey affect the process?
Yes. Cold temperatures and high humidity both interfere with curing. Spring and early fall are the best seasons for installation in Woodland Park, NJ — aim for dry days with temperatures between 60 and 85 degrees Fahrenheit.
What is the difference between epoxy and polyaspartic?
Epoxy is the primary coating that bonds to the concrete. Polyaspartic is typically used as a topcoat it cures faster, resists UV yellowing, and holds up better against hot tire pickup. Many professional installers combine both systems for maximum durability.
Take your time, pick the right contractor, and don’t cut corners on prep. Do those things and you’ll have a floor that looks great for years and probably gets a few compliments from neighbors too.